cmix_gui v1.1 released! And how it works
Repository:
https://github.com/moisespr123/cmix_gui
Hi everyone,
Today, I’m proud to announce the release of cmix_gui v1.1.
This version makes an interesting change to the software, which brought some internal coding in order to make this work.
The main feature here is that the Command Prompt window no longer shows with the cmix executable progress. Instead, all of the progress is now shown inside a Rich Text Box element and you can also save the “log” into a text file.
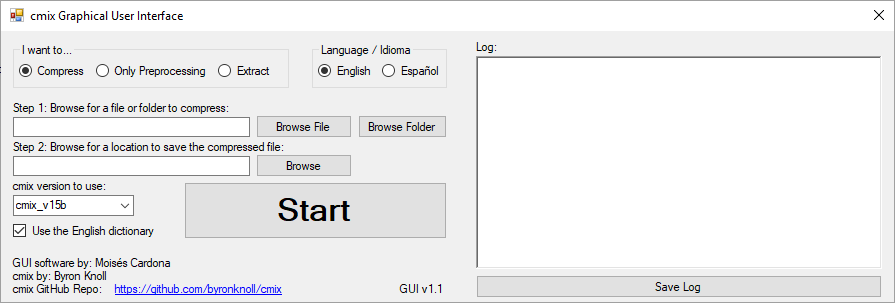
Here’s how the English GUI looks like:
And here’s the new Spanish GUI:
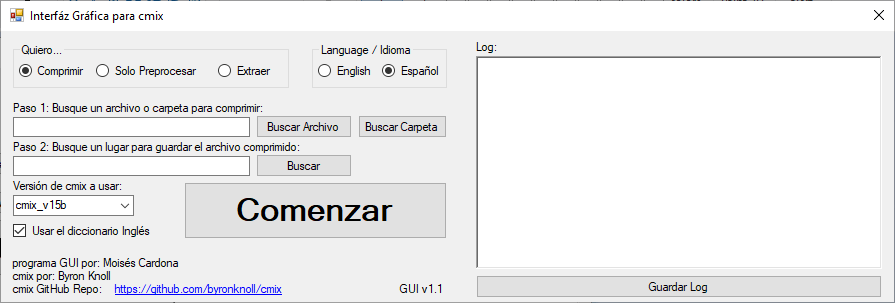
You can see the Rich Text Box on the right along with a “Save Log” button.
Internally, the software uses multithreading to separate the GUI from the cmix task process. This means that the GUI will now be responsive while you compress, extract, or preprocess a file or folder. This also means that the output you see will be in real time!
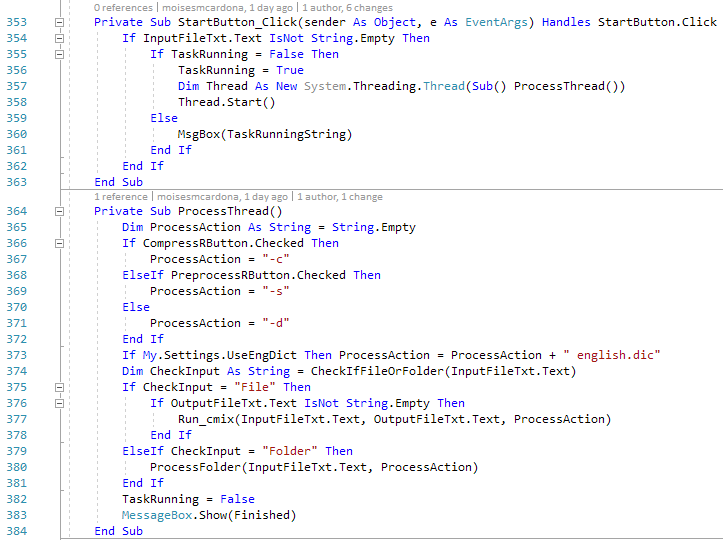
The code from the Start Button launches the code in a function called ProcessThread in a separate thread. This thread first checks which RadioButton is checked to determine what argument it should pass to cmix. Same goes to see if we are going to use the dictionary option. Once the ProcessAction is built by checking these, we check if the input file is a file or folder. If the input is a file, we run the Run_cmix function by passing the input file, output file and action as an argument. If the input is a folder, we run the ProcessFolder function passing the input file and action.
Assuming we are going to compress/extract/preprocess a folder, we go to this function:

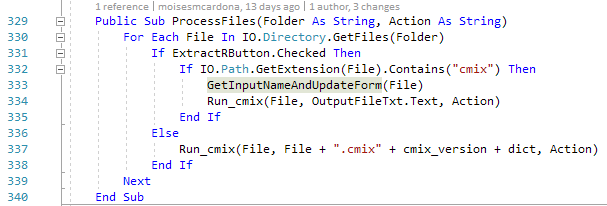
This simply will process the files in the chosen folder and then check if there’s subfolders/subdirectories.
Regardless if there are files or not in the folder, this code is run. There’s the For Each loop that actually checks if there are files and if there is, it checks if we are going to compress/preprocess or extract. It also updates the OutPut File Path accordingly. Then it passes the correct file paths to the Run_cmix functions:
Once we’ve processed the files, we pass to the next function as shown in the ProcessFolder function, which is ProcessSubfolders:

This function is really simple. It only checks if there are more folders in the folders and calls the ProcessFolder from above to compress the new files and check if there are more subfolders, performing this for each folder inside this folder.
Now it’s time to see the Run_cmix function:
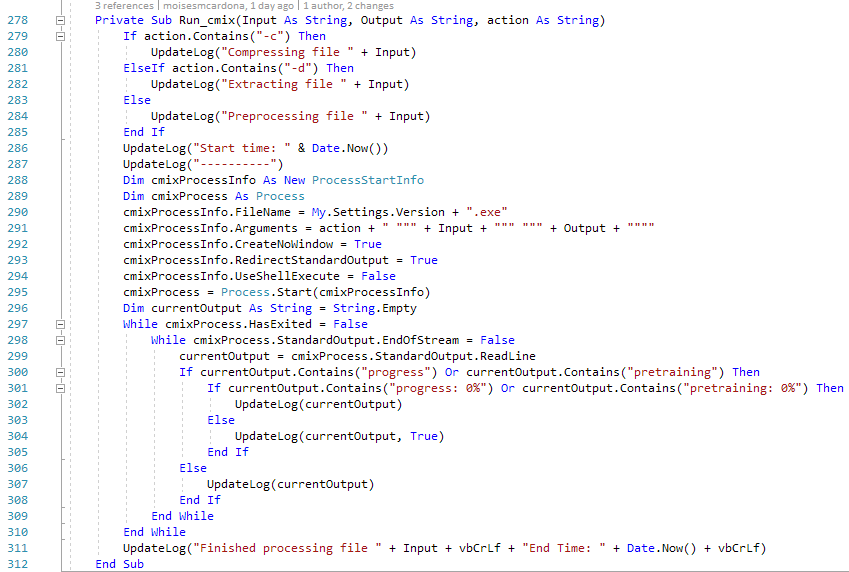
Here we check again what the action will be and we will write to the Rich Text Box a string by calling the UpdateLog function (You’ll see this later below, but for now, let’s continue in this function). We also send the start time and some ---- chars in order to make the log more readable.
We then load the cmix version to use from the software settings and pass the arguments we are going to use for the task. We then specify that we do not want a Cmd window and that we want to redirect the Standard Output (This is what you see in the terminal/command prompt when the software is running normally). We want to redirect Standard Output so our software will be able to read the progress and update its log. Otherwise, the software wouldn’t catch the progress.
Once we configured the ProcessStartInfo called cmixProcessInfo, we pass it to Process.Start which is assigned to cmixProcess. This will start the process. We will then enter a while loop while the process is still running.
Inside the While loop, we will enter another While loop. The first While loop will keep us inside as long as the process is running. The second While loop will keep us inside as long as there’s output from the process. In either case, we want to be sure we are here as we want to catch every output from the software.
If there’s software output, we will read a line and assign it to currentOutput. Then, we check whenever the line contains progress or pretraining. If this is the first percent (0%), we will just pass the output to the UpdateLog function. However, if there’s incremental progress, we still pass it to the UpdateLog function but we also send a True bool as an argument. This is to tell the UpdateLog function to replace the previous line with the one we just passed.
If the lines don’t contain progress or pretraining, we just send the output normally to the function.
When there’s no more output, we exit the While loop but we will still be inside the other While if the process is still running. If there’s new output, we enter the While inside that one again and so on. Once the process exits, we exit the first While loop. We will then print a Finish message along with the End time.
UpdateLog function
The above code calls this function several times depending on what we want to log. This function looks like this:
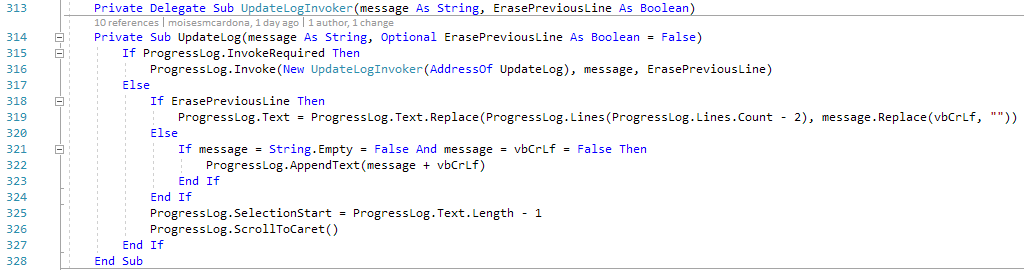
There’s also Delegate function as well that we need and you can see that just above the UpdateLog function.
Because the software runs the above code in a separate thread, we must invoke the Rich Text Box which is called ProgressLog. To invoke this element, we need to use the Invoke Methos passing a new UpdateLogInvoker method as well. Here, we use the Delegate Sub that’s above. Now, this thread will have control of the Rich Text Box and can add text to it.
If we didn’t send a True boolean as the second argument to this function, we simply append the text to the Rich Text Box (This is the Else inside the Else code) if the string isn’t empty or is not a newline character (VbCrLf).
If we did send a True boolean as the second argument, We will replace the previous line. Why does it have a - 2 in the ProgressLog.Lines.Count? This is because a count is an integer number that starts at 1, but if we want to alter a line, we must start with 0. Also, because each message adds a newline character, that means we must go to the previous line, so instead of this being ProgressLog.Lines.Count - 1, we actually need to use - 2.
After we append or replace messages at the log, we will tell the RichTextBox that we want the cursor at the end and that we want to scroll to the end.
This completes the new way this version work. Some changed needed to be done in order to allow the separate thread to work correctly.
Continuing examining the new code is the following which makes the Save Log button to work:
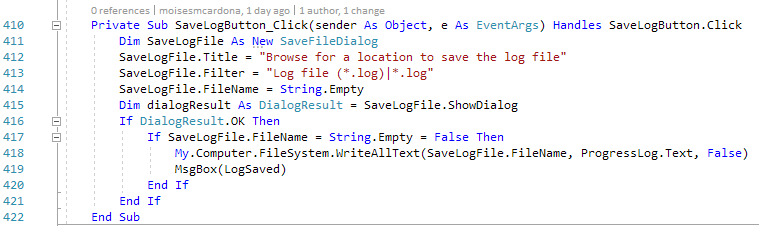
This simply makes a SaveFileDialog where the user will browse for a place to save the log. If the user presses the Save button, the log will be written.
Lastly, I added a handle that monitors whenever the Input field is changed and will call the GetInputNameAndUpdateForm function to see if what the user has written is a file or folder. This is the handle:

And the actual GetInputNameAndUpdateForm which is actually referenced in the previous code explanation above:

Here, we simply check if the input is a file or folder by calling the CheckIfFileOrFolder function. If the input is a file and the extension contains cmix, we set the version, use of dictionary and output path by calling those functions. We then mark the Extract Radiobutton. However, if the compress or preprocess button is checked, we set the Output Path the same as the input but we append .cmix at the end. We then call the SetOutputFilename function.
SetVersion and SetDict functions:

Here, we check the filename extension to adjust the GUI accordingly, setting the cmix version to use and mark the use of dictionary option if the extension ends with dict.
SetOutputFilenamePathWithoutExtension:

This function will remove the .cmix extension from the path and update the Output Filename Textbox. This function is called when we want to extract a cmix file.
SetOutputFilename:

This function will add cmix version and the use of dictionary if it’s enabled to the file path. This function is called when we are going to compress or preprocess files.
And with this, I’ve basically covered how the GUI works and calls functions depending on what we’re going to do 😁. This also served as a learning experience to learn how to redirect software output and append it to an element in the software.
Hope you all enjoy this new release!
