Today, I’m sharing my unboxing video of the MagaBolt MagX Magnetic USB-C Cable which was a campaign that ran on Kickstarter.
This is a Magnetic USB-C cable that resembles Apple’s MagSafe connector. It is compatible with all USB-C devices, so you can use this cable to charge your phone, for instance.
Yesterday, I finally received the Jack by Podo Labs, after 2 years of waiting for this Kickstarter project:
Jack by Podo Labs 1
The project was funded on February 25, 2017, and yesterday was April 8, 2019, the day I received it.
The Jack is a bluetooth receiver that turns standard 3.5mm headphones into bluetooth. The receiver supports Qualcomm’s aptX and uses a CSR8670 chip. It also uses a Maxim MAX97220 amplifier, and it’s stated to handle 2 Vrm up to 600Ohms, according to the project FAQ. The battery size is 300mAh, stated to last up to 12 hours per charge.
The Jack is also one of the few bluetooth adapters that supports headphone inline controls, so you’ll be able to control the volume and play/pause the music using the headphone cable inline remote and also use the Jack’s buttons, whichever method you prefer to use.
Going back to the pictures, the box was a bit crushed when I took it out of the package:
Jack by Podo Labs 2
Kickstarter Edition! It includes the Jack (Obviously) and a USB charging cable, which where both protected by this bubble wrap:
Jack by Podo Labs 3
Taking them out of the bubble wrap, here’s the Jack and the cable:
Jack by Podo Labs 4
I turned it on and connected my headphones, then I paired it with my phone, which was very simple to do:
Jack by Podo Labs – Pairing
As soon as I started playing back music, the LED turned from blue to green:
Jack by Podo Labs 5
I’m using my KZ ZS7 IEM’s with the Jack:
Jack by Podo Labs 6
Unfortunately, the gold clip isn’t in good conditions, but this is purely cosmetic, and of course, does not affect the sound quality:
Jack by Podo Labs 7
The Jack also came with a simple rubber case:
Jack by Podo Labs – Rubber Case 1
Jack by Podo Labs – Rubber Case 2
And that’s it with the pictures. Now, let’s talk about the sound quality.
Sound Quality
The Jack can provide a loud volume, so the amplifier is doing its job. The sound quality is good, thanks to the aptX audio codec. Unfortunately, there’s a noticeable noise that can be heard and can be annoying on quiet tracks. This is pretty common with bluetooth adapters that doesn’t use a dedicated DAC, and is noticeable on sensitive headphones and IEM’s, like the KZ ZS7 that I’m using. Other than that, the sound quality is very good but that noise is annoying. Here’s a place where Podo Labs can improve if they every decide to do another iteration of the Jack.
Music playback showed a flaw, where sometimes the blue LED will not change to green and there will be no audio at all. Sometimes, pausing a music track and resuming it will activate the Jack again and the led will change to Green. Unfortunately, this didn’t worked when I played back music files using my Hidizs AP80 portable audio player, which also supports aptX adapters and headphones.
The best way I’ve found to prevent above’s problem is to use an aptX bluetooth transmitter like the Tunai Wand or the GENKI, where it is continually transmitting the source audio. This way, the Jack is always active and receiving audio and will not have this problem.
Conclusion
In conclusion, I think what stands out the Jack is its ability to handle headphone’s inline control and its battery life. Most other adapters have some 3 to 5 or 6 hours, but I haven’t seen any other reaching 12 hours like the Jack.
The Jack does not have a dedicated audio DAC so the audio quality is comparable to other standard adapters that use a CSR chip, which is acceptable and will satisfy most of the croud, unless you’re using sensitive IEM’s like the KZ ZS7.
And now, here it is stuck to the hard drive enclosure and the laptop:
pind 8
I then opened the laptop where you can see the enclosure hanging on the back of the display without issues:
pind 9
I feel this pad will be useful for me to better organize myself. It can be removed and used on other machines, so it’s portable. The glue is pretty sticky, and to remove it, you have to apply some force. This also means it will hold whatever item we have stuck pretty well.
I’ve never had a survey sent using crowdox, which is the survey system TAIHE is using to collect backer details such as their main pledge, extra items, and of course, shipping address. I clicked the Confirm your Pledge button to have the survey started and filled as soon as possible.
I was then sent to their site where my pledge for the Gemini FHD showed up. Since this was correct, I confirmed it by clicking the Confirm & Choose Options button:
TAIHE Gemini – Step 2
I was then able to select the country (maybe for shipping), the color, and selected Yes in the question about if I’ve already paid for it in Kickstarter, since as soon as the campaign finished, the pledge amount was charged.
TAIHE Gemini – Step 3
Pressing the Save & Continue button, I was presented with the extra accessories. I added $15 in the campaign to receive the Gemini Sleeve, but I had to select it manually here by pressing the Add to Purchase button as it wasn’t chosen automatically:
TAIHE Gemini – Step 4
Then, it allowed me to set the quantity. I pledged for just one monitor, so I just leaved the quantity as 1:
TAIHE Gemini – Step 5
I then proceeded to the next step by pressing the Save Extras & Continue button:
TAIHE Gemini – Step 6
Next is the shipping address form. Once filled, just press the Save Address & Continue to Confirm button:
TAIHE Gemini – Step 7
It will show us an overview of the reward item, extras, and shipping details:
TAIHE Gemini – Step 8
If everything looks right, you’ll just need to press the Complete & Finalize Selections button:
TAIHE Gemini – Step 9
And that’s basically it! A confirmation will be shown and an email will be sent to you:
TAIHE Gemini – Step 10
So now, it’s a matter of following the project progress through their Kickstarter page and wait for the reward to be shipped, which has a delivery date for May.
Did I just received my UP AI Plus that I backed on Kickstarter?
I’ve been expecting to receive my UP AI Plus that I backed on Kickstarter last year. The project got several delays due to Intel CPU shortages, but last week, I received a tracking number from AAEON, which makes the UP Board and this just popped up today. It initially should have been delivered on Thursday.
I’ll be opening the box and seeing if this is definitely the UP AI Plus and I’ll share the photos with you soon!
The HyperDrive 2018 iPad Pro Edition is a USB-C Hub designed mainly for the 2018 iPad Pro, but it is also compatible with other USB-C devices. It has a USB-A 3.0 port, SD and MicroSD Card Reader, 3.5mm TRRS connector, compatible with headsets including inline buttons, USB-C Charging passthrough, and an HDMI output.
Because I backed it on Kickstarter, it was nice to have received it in a Kickstarted-branded case.
The HyperDrive case opened.
Immediately after opening it, we can see the HyperDrive along with another grip, USB-C extender cable, a screwdriver and some additional screws.
The HyperDrive features a grip that is removable, to make it compatible with other devices. It is attached using screws, so it makes sense to include the screwdriver. Also, since the screws are small, it comes with additional screws in case we lose the originals.
Let’s take a closer look at the HyperDrive:
The HyperDrive Front.
The HyperDrive Front does not have any branding in it. That’s on the back. It looks beautiful in the Space Grey color, which I chose when the project survey was sent so that we could choose our HyperDrive color.
The HyperDrive Back.
As I stated above, here we can see the HyperDrive branding and other regulation logos. We can see the USB-C port better since the grip didn’t allowed us to see it in the previous image.
One of the side.
On one of the sides of the HyperDrive, there’s nothing. However, that changes in the other side, where we can see the HDMI connector:
The HDMI connector.
We can plug our HDMI cable into it to duplicate or extend our screen (If we are using the HyperDrive in the PC). Now, let’s take a look at the other connectors
The connectors.
From Left to Right, we can see an LED, followed by the passthrough USB-C charging port, which we would use to charge our devices. We then have the SD Card slot on the top and the MicroSD Card slot on the bottom, followed by the USB-A 3.0 port and a 3.5mm TRRS jack. This is compatible with headsets and is also compatible with in-line controls.
The USB-C connector.
The USB-C port is pretty standard, and is centered in this Hub.
This is the other Grip that came with my HyperDrive:
The other Grip that came with the HyperDrive.
Altough we cannot see it in the above picture, it says that it is for use with covers. The grip that initially came with it was for use WITHOUT screen protectors. I myself don’t have any use for these grips, so I removed it from my HyperDrive.
The USB-C extender.
The HyperDrive came with a USB-C extender cable and grip that you can use if you’d like to connect your HyperDrive without it having direct contact with your devices.
The USB-C port of the USB-C Extender cable.
This way, we can simply attach the USB-C cable to our devices and the HyperDrive will fit perfectly, because when we use it without any grip or the extender, our HyperDrive will have a little gap in between.
The Screwdriver.
To remove the grip from the HyperDrive, we’ll use the included screwdriver.
The screws.
Be sure to keep the screws in a safe place! They are so tiny that they may get lost.
The HyperDrive with the USB-C Extension cable attached
In the above picture, I have attached the USB-C Extension cable to my HyperDrive so that you can see how it look.
The HyperDrive without the grip.
I have removed the grip in the above photo. The reason is so that I can use it directly connected to my laptop. I do not have the iPad and my main reason to get this is to use it in my Windows machines and other devices:
The HyperDrive connected to my laptop.
I attached the HyperDrive to my Lenovo Y720 laptop I purchased as my birthday gift. This laptop has a USB-C connector and you can see that the HyperDrive fits into it. You can also see there’s a bit of a gap, as I explained above. We could have solved this by using the extender USB-C cable, but I prefer to just have the HyperDrive in direct contact with it.
IEM attached to the HyperDrive.
I attached my KZ ZS7 IEM to the HyperDrive. The PC does not detect the USB Audio if there’s no headphone connected to it. Once we connect them, the laptop recognizes the audio adapter as USB PnP Audio Device.
The volume is very loud!! I always turn it down before playing back anything, and having it at just 1 or 2% was just enough.
The Windows Audio Settings.
As seen in the above image, I have the audio at just 2%. Let’s take a look at the device settings itself:
The HyperDrive in the Sound Control Panel.
We can see the HyperDrive audio listed as USB PnP Audio Device above. We’ll double click it and then go to the Advanced tab to see the device bit deph and sample rate:
The HyperDrive Bit Depth and Sample Rate.
The DAC (Digital-Analog Converter) used in the HyperDrive only has a bit depth of 16-bit and a sample rate of 48 Khz. This is enough for some, but audiophiles would have preferred it to have a depth of 24 or 32 bits and a sample rate way above the 48 Khz. However, we must remember that Audio CD has a depth of 16 bit and a sample rate of 44.1Khz. Since the HyperDrive supports 48Khz, that means that Windows needs to resample the audio to 48Khz. Still, the audio quality is good.
I’m using Tidal to stream CD-Quality tracks and I’m not noticing any quality degradation. In fact, it sounds excellent, altough I do need to turn down the volume further down. Also, there’s a little background noise, but it’s barely noticeable when there’s audio playing.
Tidal using the HyperDrive and with the volume turned down.
So, the HyperDrive does a great job handing audio. It even works in my Nintendo Switch!
HyperDrive connected to the Nintendo Switch
What does the HyperDrive looks like with its ports being used? It looks like this:
HDMI, SD Card, USB, and 3.5mm connected to the HyperDrive.
It’s been less than a day using this USB-C Hub, and so far it is handling everything great. I have experienced some problems, but it’s most likely problems related to the operating system rather than the HyperDrive. My laptop sometimes would not detect the HyperDrive or would not show any image in my external monitor, but now it’s all working fine. Also, it’s worth noting that the HyperDrive heats a little. You’ll not get burned while touching it, but I would also not have my hand at it. Even with it being warm, I wouldn’t say it overheats. It’s also working fine and haven’t experienced any disconnection issues with it.
The Kickstarter experience with this project was great. It is usual of the start of the year to get some delays due to China celebrating the Chinese New Year holiday, but this was a project where the holiday didn’t affected them so much. We are just starting March, and today I received it. Delivery was quick and they sent the tracking number very fast. It was also working at the moment they sent it to me.
I’ll definitely consider backing another of their projects, supporting them while having another gadget to play with.
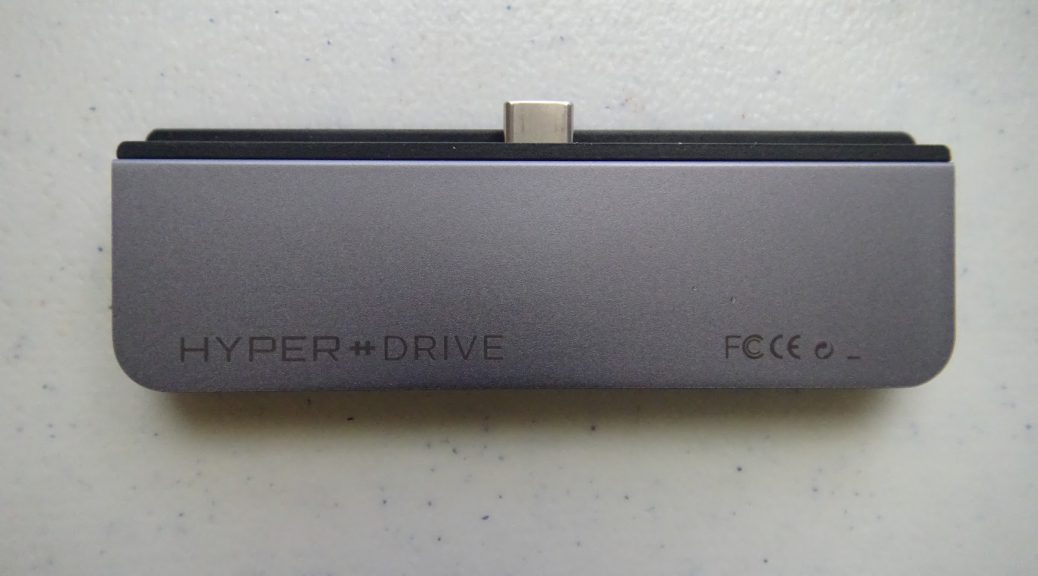
Today, I’d like to show you the Genki Bluetooth Adapter specifically made for the Nintendo Switch. This was a Kickstarter Project that ran successfully. The Genki Bluetooth adapter is basically a USB-C Audio Device that converts the audio signal into Bluetooth and transmits it to your favorite headphones or Bluetooth receivers. Given that this is basically a USB-C adapter, this means that it is also compatible with PC’s and certain Android devices supporting USB-C audio devices.
Since the Nintendo Switch doesn’t currently allow the connection of Bluetooth audio devices, this comes very handy, as the latest Switch firmware adds support for USB Audio Devices. This adapter does its magic because it has a chip that converts the audio that the Switch transmits to this device into Bluetooth and therefore enables you to use your Bluetooth devices with your switch. It also has the benefit of using Qualcomm’s aptX and aptX Low Latency codecs, the latter which is a most to play without any noticeable audio lag. It also supports the AAC codec and of course, the standard SBC codec.
As to why you’d like to use this device on your Android phone or PC, there are several reasons. The first is that all of the pairings is done on the device, which means you don’t have to play with your phone or PC bluetooth settings, and the second reason is the inclusion of the aptX Low Latency codec, which, if you have an aptX Low Latency receiving device, you’ll be able to game or watch a video without any lip-sync or gaming audio issues.
I, as a backer of interesting products, backed this device and I’ll be showing this to you. Let’s start!
The first thing you’ll notice is how it comes packaged. It looks like if it’s a Nintendo Switch game:
You can see more details of the Genki on the back of the case:
Opening it has a familiar look to a real game case, but of course, the right side is adapted to hold the adapter along with the accessories:
On the left, you see the instructions of how to use this little device:
On the right, it’s the adapter and the accessories, similar to how you’ll find a Nintendo Switch game cart on this side:
The Genki adapter is very small, as you can see here:
It also comes with this Microphone to use it on compatible games:
And of course, you’re most interested in seeing this connected to the Nintendo Switch, so here it is!
And if you want to use the adapter in a PC, you’ll need a USB-A to USB-C adapter, and it would look like this:
Finally, Windows will recognize this as an Audio device, as you can see:
Now you can enjoy wireless audio with your USB-C devices, especially on your Switch!
Today, I want to show you the ProPoint Mouse from SwiftPoint. This was a Kickstarter campaign that ran a few months ago. Last week, I got the mouse which is what you’ll be seeing today along with its accessories.
This is the Travel Set, which is the reward I got for pledging to their project:
Let’s take a look at the sides:
When we open the box, we can see 2 more boxes. One contains the Mouse while the other contains the Travel Charger:
The Mouse
Let’s start with the mouse. This is the box:
And let’s see the box sides:
When we open the mouse box, we can see the carrying case:
Below it, we can find the Quick Start Guide:
And finally, we have the warranty information as well:
Let’s take a closer look at the carrying case:
Let’s now open it:
We can see the mouse, the USB dongle ,as well as other accessories:
Here’s the mouse taken out of the case:
The sides:
The back:
The USB dongle which is also the mouse charger:
The USB-C to USB-A adapter that allows us to use the USB dongle in USB-C devices or ports:
The Parking Spot:
Lastly, it came with this accessory:
The Travel Adapter
Now, let’s take a look at the Travel Adapter. Here’s the box:
The box sides:
It’s time to open the box:
We can see the Travel Adapter. Let’s take it out:
The front:
The sides:
And finally, the back:
You can see it has different configuration for different sockets. It also has 2 USB outputs. The front serves as a passthrough to connect another device while using the adapter USB’s port and it also serves as a surge protector.
More ProPoint mouse pictures:
I use this mouse at work and at home, and it’s very comfortable and allows me to improve my productivity. Here’s more pictures of the mouse:
Here, you can notice how tiny it is:
Finally, here’s a picture when it’s in the charging dongle. It’s very nice having this feature in the same USB dongle as you can keep it connected to your PC and charge the mouse, to then be able to continue using it:
An that’s it! I hope you enjoyed the photos in this post. Have you received your ProPoint mouse from Kickstarter? Do you plan on getting one? Let me know in the comments.
Yesterday, I received the Hidizs AP80 Digital Audio Player from their kickstarter campaign. After that, I received a tracking number which is of no use because of course, I already have the unit here and it shows as “Delivered”, so it came as a surprise and was shipped by Amazon since they fullfill US orders from them.
So, here’s my unboxing video that I recorded of this tiny (smaller than I expected) audio player. Enjoy!
This website uses cookies to improve your experience. We'll assume you're ok with this, but you can opt-out if you wish.AcceptRead More
Privacy & Cookies Policy
Privacy Overview
This website uses cookies to improve your experience while you navigate through the website. Out of these, the cookies that are categorized as necessary are stored on your browser as they are essential for the working of basic functionalities of the website. We also use third-party cookies that help us analyze and understand how you use this website. These cookies will be stored in your browser only with your consent. You also have the option to opt-out of these cookies. But opting out of some of these cookies may affect your browsing experience.
Necessary cookies are absolutely essential for the website to function properly. This category only includes cookies that ensures basic functionalities and security features of the website. These cookies do not store any personal information.
Any cookies that may not be particularly necessary for the website to function and is used specifically to collect user personal data via analytics, ads, other embedded contents are termed as non-necessary cookies. It is mandatory to procure user consent prior to running these cookies on your website.