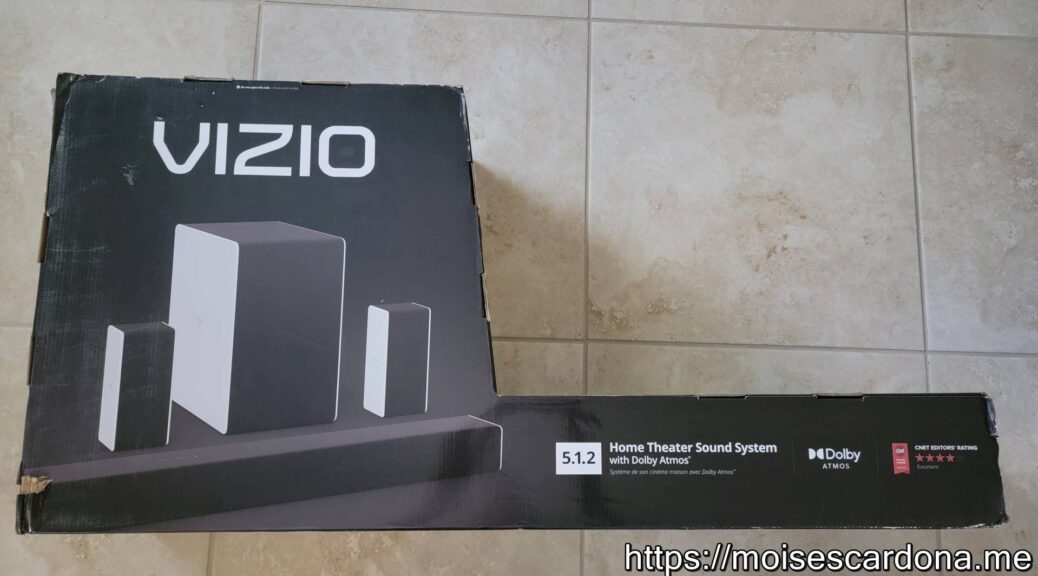
This is a USB 2.0 Wireless Adapter about the size of a mouse USB receiver, very small. It follows the Wireless AC protocol and should theoretically give us speeds of up to 600Mbit/s. If that’s true or not, we’ll see later in this post.
This wireless receiver is currently being sold at about $13 dollars on Amazon, or at $12 if you buy them as a “Renewed” item, which is Amazon’s terms for refurbished items.
The above ones were purchased renewed, as this is more friendly to the planet and should work just like a new one. In fact, you can see one of them is packaged differently than the other. This doesn’t matter, but you know they are repackaged items because of how they are.
Unboxing
The front of the box shows the overall product details, like saying it should be faster on the 2.4Ghz band and that it also supports the 5Ghz band, given it’s a dual band adapter:
On the back, we have a better description of the adapter:
The receiver is packaged inside this big box:
The reason for it to be big is that they have packaged a regular CD with the device driver. It has to be known that Windows 10 detects the adapter natively and uses its own driver, as we will see later too.
We also have the user manual and an Amazon Certified Refurbished card.
The adapter is really small:
Taken out of the box:
Now it’s time to plug it into my laptop. Almost unnoticeable:
Testing
The TP-Link Archer T2U Nano is natively recognized by Windows 10, and uses Microsoft’s native driver:
However, it only seems to be using a fraction of my wireless router, only showing it is running at a rate of 86.7Mbit/s:
In fact, running a speed test doesn’t give the maximum speed of 250Mbit/s of download I’m supposed to be getting:
In comparison, when using the laptop’s integrated Wifi card, it indeed reaches the full 250Mbit/s speed:
I then decided to use TP-Link’s driver to see if that would improve things, but infortunately that wasn’t the case:
And even switched to the other adapter to make sure it wasn’t defective. Unfortunately, I also got a slower than expected speed:
Conclusion
The TP-Link Archer T2U is a small wireless adapter. Maybe it’s because of that the fact that we don’t see the full speed being utilized, but one thing is for sure; it serves its initial purpose of bringing Wi-Fi to a laptop. While it may be slow, we can also see that the adapter works simply by inserting it. No extra drivers are needed on Windows 10, and we can start navigating the web fast.
For just $12 or $13 dollars, we can’t expect it to do miracles with the speed, but it will keep you connected with no dropouts.
The internet plan used for the purpose of this review is 250Mbit/s of download and 25mbit/s of upload speed.
If you’re interested, you can purchase this item on Amazon below:
Ever since I got my Hidizs MS4 IEM, I became a journey to try several ear tips, after I lost one of their “Bass” ear tips. This journey began with me trying some Chinese replacements tips, in particular, some called “Spiral ear tips”. They were good, but I still tried other tips, including the highly acclaimed Spinfits.
Unfortunately, I wasn’t pleased with the Spinfits, as I found it degraded the sound to my likes. It was until I found the AZLA SednaEarFitLight that I was really pleased with how the sound came from them.
AZLA is known to make one of the best ear tips. Their SednaEarFit line improves both sound and comfort, but one of their issues has to do with getting the right fit, and the high price. However, once you find the correct size for you, you will be really pleased with how they sound.
AZLA recently released the SednaEarFit Xelastec, which is made of different material that adapts to your ear. This makes them fit great and will not, theoretically, fall.
I found that one of the most important thing that affects the size is the nozzle size and diameter. The smaller the diameter, the more dull the sound will be, and the longer or shorter the nozzle length is, is how the sound frequency will get affected.
On the Hidizs MS4, the shorter the nozzle length is, will produce more bass, great mids, and tame the treble. The longer the nozzle length is, there may be less bass, with more treble sparks, and the mids, well, fall in the middle or may get behind.
Once I tried the SednaEarFit Xelastec, they became my favorite ear tip. Here’s why:
Ease of use
Some ear tips have a hard time getting placed in the IEM nozzle, because of its diameter. This was the case when I got the Spinfit ear tip, as the diameter was small. With the SednaEarFit Xelastec, they just fit without having any struggles. This may be due to its adapting material.
Sound
The nozzle length of the Xelastec is shorter and just a bit smaller than their SednaEarFitLight. However, due to the material it’s made, the sound doesn’t get affected much. In fact, it does a great job to reproduce a great frequency response. The bass isn’t overwhelmed but is improved. The mids comes more forward but not too much. The treble is tamed with no sparks to it. The sound stage is very good to my likes, which is a forward sound with great instrument separation and energy.
Fit
This really depends on the tip size used. In my case, the best size is their ML (Medium-Large) size. They are very comfortable and fits very nice in my ears. I can use them for hours without getting itchy or without causing discomfort. They also do not fall. The material they are made will give you a sticky feeling, unlike silicone tips which depending on the one used, may cause you some itch and discomfort.
The only downside is that due to them being kind of sticky, you may have to clean them often.
Price
Let’s be honest, these tips are not cheap, but they are really worth it. The main problem you’ll probably face is spending money to test the different tip sizes. I used to be a medium size when it comes to tips, but for the AZLA tips, the best ones are their Medium-Large. Fortunately, you can get various tip sizes but at a premium.
Personally, I got the pack that comes with medium, medium-large, and large tips, just to see if the medium-large would still fit or I needed to go down to the medium tips. The large ones are large indeed.
So, for starters, you may want to start here. At a price of $28.00, each tip size comes at $9.33 approximately.
Conclusion
I can recommend these tips if you’re looking for comfort without compromising the sound. It may even improve it depending on which tips you are using. Remember that not all tips will produce the same sound with every IEM, so your mileage will vary here, but if you, like me, own the Hidizs MS4 IEM, I can recommend them. AZLA makes one of the most amazing and high quality ear tips I’ve ever used.
You can get these tips on Amazon here:
Individual sizes:
Comparison of the sound of the different Hiby R3 models
Today, I want to talk to you about the different sound signatures of the different Hiby R3 models.
Hiby is a company that specializes in audio hardware and headphones. They have created Digital Audio Players, Bluetooth receivers, and headphones. They have also created a modified Android version for their Hiby R5 and R6 players while also having developed the HibyOS operating system that powers the Hiby R3. They also use a range of DACs in their products that ultimately gives them their signature sound.
Two years ago, Hiby launched the Hiby R3 player on Kickstarter. This particular model used an ES9028Q2M DAC. It also offered a lot of great features for a price of just $189 at that time. Then, in the last months of the last year, Hiby launched the Hiby R3 Pro, changing the DAC to not one, but 2 Cirrus Logic CS43131. Finally, a few months ago, Hiby launched the new Hiby R3 Pro Saber which went back to using ESS DACs. This time, powered by two ES9218p DACs.
These players each have their advantages in the sound department, but none of them sounds the same. This is why I’ll be giving my thoughts on this.
Hiby R3
The original Hiby R3 is musical in the mids. The highs are not bright and the bass is not overwelmed. The sound is neither warm or bright, but rather neutral. This is why it seems like the mids have a better presentation.
Hiby R3 Pro
The Hiby R3 Pro changed the DAC to dual CS43131. Cirrus Logic DACs are warmer than those from ESS, which sounds more analytical and sometimes bright. Because of this, the bass and mids have a warmer tone, including making the vocals be warmer, The sound is also a bit more open due to the two DACs.
Hiby R3 Pro Saber
The Hiby R3 Pro Saber went back to the ESS DACs, particularly, the ES9218p. These DACs sound different depending on their implementation. On the Hiby R3 Pro Saber, the sound is more analytical, airy, and more open. The hights are bright but not to the point where they will cause hearing fatigue. I rather like the sound this way because it makes the highs be more detailed. The voices have a lot more air and are more forward and clearer than on the R3 Pro, which was warmer.
Below, you’ll find a video I recorded talking about these different models and their sound signature:
Which DAP is your favorite? Let me know in the comments.
This is a Bluetooth adapter that works as a PC audio card. It transmits audio via Bluetooth using the SBC, FastStream, aptX, or aptX Low Latency codec, depending on which codecc your headphone or adapter supports. Having the aptX codec provides us with a better audio experience.
The aptX Low Latency codec allows us to watch movies and videos without any audio delay. Most Bluetooth receivers today support this codec and having a transmitter with it makes us take advantage of this.
Unboxing
The DG80 packaging is small and simple.
We can see the adapter along with its manual and documentation behind.
We can see the transmitter is really small.
Finally, we have the included documentation.
Package content:
Using the transmitter
Using this transmitter is as simple as plugging it into a USB port and going into pairing mode.
We can see Windows detects it as Avantree DG80.
The transmitter has a bit depth and sample rate of 16bit/48khz, which is common with these adapters.
I paired it with my Fiio BTR5 and we can see it is using the aptX Low Latency codec.
Here’s a video of the pairing process of the adapter:
Audio Quality
Becuase this transmitter uses a Qualcomm chipset, the sound quality is realy great, thanks to its support of the aptX and aptX Low Latency codecs.
Signal strength
Avantree claims the adapter will work up to 30 meters or 100 feet. This may be true unless there are some obstacles in the way. In my tests with the Whooshi adapter, known to have signal issues, I was able to listen to music while I was in the same room. However, going away I could hear the audio getting cut. If you’re looking for the best signal range, the Avantree DG60 is a better choice.
Conclusion
If you still do not have a USB Bluetooth audio transmitter, the Avantree DG80 is a good start. It’s small, portable, and cheap. It also supports the aptX and aptX Low Latency codecs to provide excellent audio quality.
The Hidizs Mermaid MS1 and MS4 IEMs with their cables and accessories
Yesterday, I received the brand-new Hidizs Mermaid MS1 and MS4 In-Ear Monitors Absolute Kits.
Hidizs Mermaid MS1 and MS4 IEMs with their cables and accessories
The Hidizs Mermaid MS1 is an IEM with 1 Dynamic Driver, while the Hidizs Mermaid MS4 is an IEM with 1 Dynamic Driver and 3 Knowles Balanced Armatures.
Hidizs Mermaid MS4
My initial impressions are excellent. These IEMs do a lot to reproduce the music. I found that the MS1, with just the Dynamic Driver, produces a warm sound with great mids and smooth bass and treble. The MS4, on the other hand, improves the bass and treble while having great mids. Since the MS4 uses 3 balanced armatures for the mids and treble, they do a great job, and since the Dynamic Driver is focused on the bass, it also does a great job. The MS1, on the other hand, produces a warmer sound since the Dynamic Driver needs to reproduce the entire frequency spectrum.
The Hidizs Absolute Kits come with a choice of a 2.5mm or 4.4mm balanced cable, USB-C 2-pin cable and an aptX Bluetooth Cable using a CSR8645 chipset. They are also compatible with other 2-pin 0.78mm IEMs and you can also use other aftermarket cables due to their 2-pin connectors.
Hidizs balanced 2.5mm to 2-pin cable
Hidizs BT-01 Bluetooth Cable
Hidizs MS4 with the 3.5mm cable
Hidizs MS4 with the balanced 2.5mm cable
Hidizs USB-C cable with Hidizs MS4
Hidizs USB-C to 2-pin cable
Hidizs MS4 with the BT-01 Bluetooth Cable
The IEMs can be driven easily since the MS1 only has an impedance of just 15Ω while the MS4 has an impedance of just 12Ω. However, you can use your favorite DAC like the Hidizs DH1000/Tempotec Sonata iDSD Plus and use the balanced output to enjoy an even better sound. You can also use them with the 3.5mm cable with the Hidizs AP80.
Now, here’s my unboxing video I recorded yesterday where I unbox both kits, their cables and accessories:
I personally like the MS4 due to their more punchier bass and their extended treble. The MS1 have more forward vocals, so if you’re looking for that, the MS1 is for you, but if you want the treble and a bit more bass, go for the MS4.
Here’s the review video I also recorded with my thoughts on the IEMs and the cables:
Overall, Hidizs did a great job with these new In-Ear Monitors.
You can purchase these 2 Hidizs IEMs at Amazon using the following links:
Today, I’ll be reviewing the TRN BT20 Bluetooth adapter for 2-pin In-Ear Monitors (IEM):
TRN BT20 1
The TRN BT20 is a Bluetooth 5.0 adapter that is available in 3 different versions:
2-pin 0.75mm
2-pin 0.78mm
MMCX
The version I purchased is the 2-pin 0.78mm for my KZ ZS7 IEM’s.
The adapter syncs together to bring you stereo sound. It uses a Realtek Bluetooth 5.0 SoC that while it is not specified which specific chipset it’s being used, I suspect it may be using the Realtek RTL8763B.
Because of it using a Realtek chipset, it doesn’t support the aptX audio codec, but it does support AAC along with SBC. This means that when paired with an iPhone or Android device, it should use AAC instead of SBC, and for backward compatibility, the SBC codec will be chosen if a device lacks the AAC codec.
Packaging
The packaging is very simple, as can be seen in the following images:
Here, you can see the sides:
TRN BT20 2
TRN BT20 4
And here you can see the back:
TRN BT20 3
To open it, you have to slide the box outside:
TRN BT20 5
Opening the box, both pieces of the TRN BT20 are revealed:
TRN BT20 6
As you can see, they are very well protected and can be easily taken out:
TRN BT20 11
Continuing unboxing the box, we need to take out the cable and manuals which are after taking out the following:
TRN BT20 7
There’s a Micro USB Y-Cable that allows us to charge both Bluetooth pieces at the same time:
TRN BT20 8
TRN BT20 18
TRN BT20 19
Finally, we have the manual, warranty card, and the card that says it passed quality checks:
TRN BT20 9
TRN BT20 10
Using the TRN BT20 with the KZ ZS7
I was using my KZ ZS7 IEMs with a Revonext 3.5mm 3-button cable before using this TRN BT20 Bluetooth adapter.
TRN BT20 12
I removed the IEM from the cable so that I can plug them in the adapters:
TRN BT20 13
Plugging them was straightforward and they are tightly attached:
TRN BT20 14
Fitting
This is a part where these don’t work well with my ears and the KZ ZS7.
This adapter is supposed to be hanged behind the ears:
TRN BT20 15
Unfortunately, My KZ ZS7 doesn’t get sealed in my ear and the TRN BT20 pushes them out, so I’m using them without hanging them behind my ears:
TRN BT20 16
TRN BT20 17
They are not heavy and now my KZ ZS7 seals fine in my ears. I think if TRN releases a version of the BT20 with a larger ear hook, then they may fit better. Otherwise, I don’t have a problem using them this way.
Pairing
Pairing the TRN BT20 with my phone was extremely easy. You just turn it on and it will enter in pairing mode automatically. From there, you can choose it in your phone and it will pair:
TRN BT20 Pairing
Charging
I haven’t yet discharged the TRN BT20 battery entirely, as I don’t listen to music at loud volumes. My Android phone reports 50% of battery left after about 3 hours of continuous usage. The volume is set around 1/4 of the slider and that produces a comfortable audio level to my liking. Past it, and it’s too loud. As mentioned above, the TRN BT20 supports the AAC audio codec which my phone is using. Because of this, charging normally takes around 45 minutes (Remember I have not discharged this completely). I’m not using the supplied cable to charge them. Rather, I’m using the UGREEN Micro USB Y cable:
TRN BT20 20
There’s one side that will always charge faster because one side acts as a receiver while the other is receiving and transmitting the audio to the other BT20 side. I have paired the left adapter to my phone so that one takes a couple of more minutes to finish charging.
Audio Quality
I’m actually surprised by the quality of these. I think, personally, that the TRN BT20 has an advantage given that it uses a Realtek SoC on both sides. This means each side is decoding its own audio channel. This is similar to how balanced DACs work, in that each DAC decodes a specific channel. This has the advantage of improving the sound stage and channel separation. That’s exactly what I’m experiencing with the TRN BT20. The tonality is just awesome.
Because each side is decoding their own corresponding audio channel, I feel this improves the sound separation much like how balanced DACs work, except that there are no cables around.
It’s true that the TRN BT20 doesn’t support aptX nor LDAC, but given its ability to decode AAC, the audio quality is of very good quality. Even using the SBC codec, I find the quality to be amazing.
TRN BT20 AAC codec with my Samsung Galaxy S9+
There’s a bit of a hiss when used with sensitive IEM’s, but it’s way less than other Bluetooth adapters, especially those that are not using dedicated audio DAC’s in their implementations. The sound quality is not degraded because of this, but I’m sure some may not like the hissing.
Overall, I’m pleased with the sound quality, and I’m using this Bluetooth adapter rather than my USB DACs with their cables.
Compatibility
I’ve been using the TRN BT20 with my Samsung Galaxy S9+, where it uses the AAC audio codec. The sound quality is excellent.
I also tested this with my HiBy R3 and Hidizs AP80 which I use as a DAC and Bluetooth transmitter to transmit my PC audio to the BT20. In this case, the SBC codec is used, as Hiby OS does not support transmitting AAC audio yet, although HiBy replied to a comment saying they may add this in a future firmware.
Hidizs AP80 using in DAC mode and transmitting audio via Bluetooth
I normally set the volume between 7 to 13. Going up, it is too loud.
The only problem I found is that when using some Qualcomm transmitters with Windows, the volume will be extremely loud.
Conclusion
At around $33-34 on Amazon, you can’t go wrong with the TRN BT20. They do not have aptX, but their ability to decode AAC means the audio quality is not compromised.
The use of Realtek on both sides means each side decodes their own channel audio, which can improve the sound separation and sound stage.
There’s a bit of hissing which could be distracting for some, but it’s not very noticeable compared to other adapters.
The battery life is great and will last some hours. Charging should take at maximum 2 hours, but it charges in way less than that, having a 70mAh battery on each side, and charging at about 50mAh, it should take about an hour and a few minutes.
Unfortunately, it’s the fitting that didn’t work for me, but this part is one that depends on the IEM’s being used and your ears.
I’d rate this 4 out of 5, that last star being because of it not playing nice with my ears.
You can get the TRN BT20 on Amazon. Select the version that is compatible with your IEMs:
Yesterday, I finally received the Jack by Podo Labs, after 2 years of waiting for this Kickstarter project:
Jack by Podo Labs 1
The project was funded on February 25, 2017, and yesterday was April 8, 2019, the day I received it.
The Jack is a bluetooth receiver that turns standard 3.5mm headphones into bluetooth. The receiver supports Qualcomm’s aptX and uses a CSR8670 chip. It also uses a Maxim MAX97220 amplifier, and it’s stated to handle 2 Vrm up to 600Ohms, according to the project FAQ. The battery size is 300mAh, stated to last up to 12 hours per charge.
The Jack is also one of the few bluetooth adapters that supports headphone inline controls, so you’ll be able to control the volume and play/pause the music using the headphone cable inline remote and also use the Jack’s buttons, whichever method you prefer to use.
Going back to the pictures, the box was a bit crushed when I took it out of the package:
Jack by Podo Labs 2
Kickstarter Edition! It includes the Jack (Obviously) and a USB charging cable, which where both protected by this bubble wrap:
Jack by Podo Labs 3
Taking them out of the bubble wrap, here’s the Jack and the cable:
Jack by Podo Labs 4
I turned it on and connected my headphones, then I paired it with my phone, which was very simple to do:
Jack by Podo Labs – Pairing
As soon as I started playing back music, the LED turned from blue to green:
Jack by Podo Labs 5
I’m using my KZ ZS7 IEM’s with the Jack:
Jack by Podo Labs 6
Unfortunately, the gold clip isn’t in good conditions, but this is purely cosmetic, and of course, does not affect the sound quality:
Jack by Podo Labs 7
The Jack also came with a simple rubber case:
Jack by Podo Labs – Rubber Case 1
Jack by Podo Labs – Rubber Case 2
And that’s it with the pictures. Now, let’s talk about the sound quality.
Sound Quality
The Jack can provide a loud volume, so the amplifier is doing its job. The sound quality is good, thanks to the aptX audio codec. Unfortunately, there’s a noticeable noise that can be heard and can be annoying on quiet tracks. This is pretty common with bluetooth adapters that doesn’t use a dedicated DAC, and is noticeable on sensitive headphones and IEM’s, like the KZ ZS7 that I’m using. Other than that, the sound quality is very good but that noise is annoying. Here’s a place where Podo Labs can improve if they every decide to do another iteration of the Jack.
Music playback showed a flaw, where sometimes the blue LED will not change to green and there will be no audio at all. Sometimes, pausing a music track and resuming it will activate the Jack again and the led will change to Green. Unfortunately, this didn’t worked when I played back music files using my Hidizs AP80 portable audio player, which also supports aptX adapters and headphones.
The best way I’ve found to prevent above’s problem is to use an aptX bluetooth transmitter like the Tunai Wand or the GENKI, where it is continually transmitting the source audio. This way, the Jack is always active and receiving audio and will not have this problem.
Conclusion
In conclusion, I think what stands out the Jack is its ability to handle headphone’s inline control and its battery life. Most other adapters have some 3 to 5 or 6 hours, but I haven’t seen any other reaching 12 hours like the Jack.
The Jack does not have a dedicated audio DAC so the audio quality is comparable to other standard adapters that use a CSR chip, which is acceptable and will satisfy most of the croud, unless you’re using sensitive IEM’s like the KZ ZS7.
Yesterday, I received the Tempotec Sonata iDSD Plus:
The Tempotec Sonata iDSD Plus Box
This is a DAC and AMP all in one device. It has Dual ES9018K2M, Dual ES9601K amplifiers, as well as a Balanced 2.5mm headphone jack as well as the regular 3.5mm jack.
The device is very similar to the Hidizs DH1000. In fact, it is a rebranded Tempotec product. Today, I’ll take a look at a newer Tempotec Sonata iDSD Plus revision.
The Tempotec unit I received should have some problems that the Hidizs DH1000 had. In particular, this unit should have the Blue LED problem fixed, where it would be permanently turned on at some point of the Hidizs DH1000 lifetime. I’ll also be comparing this version to the Hidizs DAC.
As seen in the picture above, the box look very similar. Let’s take the wrapping off:
The Tempotec Sonata iDSD Plus Box without the wrap
Now, it’s time to open the box:
The Tempotec Sonata iDSD Plus inside the box
We find the Tempotec Sonata iDSD Plus inside the box. It is the first thing we see. Below the box, we find some more items:
Tempotec Sonata iDSD Plus cables
We find a USB-A to Micro USB, a Micro USB to Micro USB OTG cable, and a USB-C to Micro USB cable. We also have the manual and other stuff.
Let’s take a look at the Sonata iDSD Plus:
Tempotec Sonata iDSD Plus
It came well protected. The bag keeps the iDSD free from scratches, since it uses glass on both sides.
Tempotec Sonata iDSD Plus
Not a single scratch in the bag. That’s great. Now, let’s take out our Sonata iDSD Plus:
Tempotec Sonata iDSD Plus Front
This is the front. While we can’t see the charging LED, it is in the bottom left corner. It is blue, just like the Hidizs DH1000, and will turn on while charging. Also, on the upper left, we can see the volume buttons. We’ll see them later in details.
Tempotec Sonata iDSD Plus Back
The back has the Tempotec branding, just like the Hidizs DH1000 also had the Hidizs branding.
Tempotec Sonata iDSD Plus USB ports
The Tempotec Sonata iDSD Plus has 3 USB ports. The USB-A is the so called “Private” port. This allows you to connect your compatible DAPs like the Hidizs AP80 and HiBy R3 when the USB mode is set to “Dock”. It also should work on Android and iOS devices when using the HibyMusic app.
The other ports are Micro USB. The middle port is for data transmission while the right port is for charging. The Tempotec Sonata iDSD Plus charges at 5V/1A, usually drawing 800 mA but it can draw 940 mA if it is also turned on while listening to music and it is charging.
Tempotec Sonata iDSD Plus audio jacks and power button
On the other side, we can see the standard 3.5mm audio jack on the left, the 2.5mm balanced jack in the middle, and the power button on the right. Between the power button and 2.5mm audio jack, we see the power LED, which will be green if it’s turned on, and will turn red when the battery is low.
Next, we’ll take a look at the cables:
USB-A to Micro USB cable
Above, we have the USB-A to Micro USB cable. This is the cable that you’ll be using to use the Tempotec Sonata iDSD Plus in your computer, unless yours have a USB-C port, in which case you can use the included USB-C to Micro USB cable:
The USB-C to Micro USB cable
The USB-C to Micro USB cable also works with compatible Android devices. It works really well in my Samsung Galaxy S9+.
If your device has a Micro USB port, you’ll probably need this OTG cable, which is also included:
The Micro USB to Micro USB OTG cable
However, not all Micro USB phones support the OTG connection, so please be sure to check if your phone is compatible with USB Audio Class 2 audio devices.
The Tempotec Sonata iDSD Plus manual comes in 2 languages:
The Tempotec Sonata iDSD Plus manual in Chinese
In Chinese.
The Tempotec Sonata iDSD Plus manual in English
And in English.
It also came with the Hi-Res Audio stickers:
Tempotec Sonata iDSD Plus Hi-Res stickers
Here’s how it looks when it has both USB ports plugged in:
Tempotec Sonata iDSD Plus with both Micro USB ports plugged
Comparison with the Hidizs DH1000
Let’s compare the device with the Hidizs DH1000. Please note that due to hardware problems, I tried to repair the Hidizs DH1000, and while it works, I have it covered differently than how it used to look.
The Tempotec Sonata iDSD Plus with the Hidizs DH1000 side by side (1)
We can see they look similar.
The Tempotec Sonata iDSD Plus with the Hidizs DH1000 side by side (2)
The back also look similar. However, here is where we’ll see the main difference:
The volume buttons of the Hidizs DH1000
The volume buttons of the Tempotec Sonata iDSD Plus
The Hidizs DH1000 has the volume buttons marked with paint, while the Tempotec iDSD Plus has the actual marks deep in the buttons.
Finally, both the USB ports and audio jacks look the same:
The Hidizs and Tempotec USB ports
The Hidizs and Tempotec Audio jacks
Sound
Tempotec iDSD Plus in Windows Sound Settings
The device is detected on Windows a USB HD AUDIO as soon as it is plugged in.
The sound quality of the Tempotec Sonata iDSD Plus is the same as the Hidizs DH1000. I seem to find it more pleasant, but I tried switching between the Hidizs and Tempotec to see if I could find any difference. I may prefer the Tempotec sound, but the Hidizs one sounds quite similar, if not, identical. They both use the same ES9018K2M chips and ES9601K amplifiers. Theoretically, even the printed circuit board should be the same, or almost identical, except for the charging circuit, where it should be different to prevent possible charging issues.
I’m using the KZ ZS7 IEMs with a 2.5mm balanced cable. The bass feels powerful. This is especially true when listening to Twenty One Pilots “Trench” album. The mids are balanced, vocals are very well presented, and the treble, that’s the part where this DAC shines. The frequency response, I would say, is neutral. Other DACs would prefer to focus on providing forward vocals, and other instruments would sound recessed, but this is not the case with this DAC. Instrument separation is also pretty good. The sound feels open and wide, and the overal sound presentation is just as good and even relaxing. I can confortably listen to music in Tidal and enjoy every note in the song.
For around $130, this DAC does not dissapoint. The Hidizs DH1000 was my favorite, but now I have this Tempotec which will be with me at all times, and I’ll be attaching it to my HiBy R3 and Hidizs AP80 DAPs. Really, I haven’t found a DAC that outperforms this one.
This is a cable (or dongle) that allows you to connect your 3.5mm headphones to your devices that have a USB-C connector, or to a USB-A connector by using a USB-C to USB-A adapter. It features a sample rate of up to 24-bit and 192khz, but you’ll need to update the firmware to be able to use it. We’ll see more about the firmware update process later. First, let’s proceed with the unboxing.
Opening the box reveals a carrying case:
Carrying Case inside the box
Taking it out we can clearly see the Hidizs logo in it:
Hidizs Sonata HD Carrying Case – Front
The back is just plain:
Hidizs Sonata HD Carrying Case – Back
Inside, we can see the Sonata HD Cable and a USB-C to USB-A adapter:
The carrying case content
A closer look at the cable and adapter inside the carrying case:
A closer look at the contents inside the case
A closer look at the DAC We can see the Hidizs Logo at the USB-C connector side:
DAC – Front
We can also see the Hi-Res Audio logo on the other side at the USB-C connector:
Hi-Res logo on the back
Side by Side comparon with the Google and Apple DACs:
From left to right: Google DAC, Apple DAC, and the Hidizs Sonata HD DAC
Now, let’s see the USB-C to USB-A adapter closer:
USB-C to USB-A adapter
I connected the cable to the adapter and to my USB Hub which is connected to my desktop PC:
Sonata HD A: Prioritizes the Call. When I tested this firmware, it allows simultaneous voice and music. This is the firmware you’ll want to use if you’re going to stream on YouTube, Twitch, etc.
Sonata HD C: Prioritizes the Audio. When I tested this firmware, it was similar to the Sonata HD A firmware but I could no longer use the microphone as soon as the system produced audio. This firmware has a sample rate of 24-bit/192khz
Sonata HD D: Pure Music. This firmware will also provide 24-bit/192khz but it will disable the adapter input function. You’ll still be able to use earphone inline remote control.
To update the firmware, you’ll want to launch the respective executable. You’ll be presented with the firmware flashing utility:
The Hidizs Sonata HD firmware flashing utility
We should write in the Vendor ID: 22e1, and on the Product ID: e202. You can check these values by going to the Device Manager and selecting the Sonata HD Cable under the Sound, video and Game Controllers section:
Sonata HD DAC in the Device Manager
VID and PID of the Sonata HD Cable
We can press the Write EEPROM button on the firmware flashing utility and we’ll be shown with this message:
Firmware Flashing message
We’ll simply disconnect the DAC, connect it again, and press OK. The firmware flashing will begin:
Flashing the firmware
If it finishes successful, you’ll see a successful message:
Write to EEPROM OK! Message
That’s it! We now need to unplug it and connect it again and then we can go to the sound settings and check that we can choose a sample rate of 24-bit/192khz:
Hidizs Sonata HD in the Sound Settings
We click on Sound Control Panel and double click on the Sonata HD:
Sonata HD in the Sound Settings
Now, we can go to the Advanced tab and select 24-bit/192khz:
24 bit and 192 Khz mode in the Sound Settings
We can also use Tidal’s WASAPI mode with this adapter. Just be sure to turn the volume very low. This DAC is very loud!!!
TIDAL with the Sonata HD cable
Just select the Exclusive Mode button and that should be it. Now, you can enjoy your music!
Tidal
Sound Impressions
Listening to this DAC the sound is detailed, but the vocals seems to be more forward. It has a good sound separation, and it is very loud, which is why I have my DAC at just 2%. My headphones (KZ ZS7) are high sensitivity, low impedance IEM’s, so they will sound loud at low volume levels. The Bass is great, and so is the treble. No complains here. I also own the Hidizs DH1000 and their AP80 player and they all sound excellent. The Hidizs DH1000 provides a more neutral sound and the AP80 just shines at all of the frequencies, altough the DH1000 is still a more neutral and extended treble option.
I hope you liked this post. Do you own the Sonata HD Cable? Let me know in the comments.
If you don’t yet have this dongle, you can get it on Amazon using the following link:
I just received these today and I’m enjoying the balanced sound it provides. It’s not too warm, but it’s also not too bright. The mids shine, the treble is there, and the bass feels real.
Previously, I’ve been using the Samsung AKG-Tuned earbuds which I also enjoy the sound, but these feels an improvement because they retrieve more detail of the song.
These are also my first KZ IEMs, and I’ve been wanting to try them since the past generation, but decided against because of some troubles I’ve heard of. Now that I got to listen to these, they really sound wonderful.
Powered by 1 Dynamic Driver + 4 Balanced Armatures, you can hear everything without any distortions, a problem I’ve faced with other buds, where they would emphasize the bass, or have a v-shaped profile. These aren’t v-shaped nor emphasize the bass over other frequencies. Yes, they have plenty of bass, but you can hear everything without any frequency being overpowered.
I’m currently using these with my Hidizs DH1000 DAC/AMP:
I’m still experimenting and listening to different albums. So far, everything sounds nice. I do have a complaint here, and is that sometimes the presence of some instruments may seem to be reduced, but you still enjoy everything in the track. They have a great sound separation and clarity. Awesome!
This website uses cookies to improve your experience. We'll assume you're ok with this, but you can opt-out if you wish.AcceptRead More
Privacy & Cookies Policy
Privacy Overview
This website uses cookies to improve your experience while you navigate through the website. Out of these, the cookies that are categorized as necessary are stored on your browser as they are essential for the working of basic functionalities of the website. We also use third-party cookies that help us analyze and understand how you use this website. These cookies will be stored in your browser only with your consent. You also have the option to opt-out of these cookies. But opting out of some of these cookies may affect your browsing experience.
Necessary cookies are absolutely essential for the website to function properly. This category only includes cookies that ensures basic functionalities and security features of the website. These cookies do not store any personal information.
Any cookies that may not be particularly necessary for the website to function and is used specifically to collect user personal data via analytics, ads, other embedded contents are termed as non-necessary cookies. It is mandatory to procure user consent prior to running these cookies on your website.